How to Dispute a Deduction in the APDP App
Learn about:
-
The differences between disputing claim lines and invoices
-
How to dispute by claim
-
How to dispute by invoice
On September 27, 2021, Walmart launched its new Accounts Payable Disputes Portal (APDP) app in Retail Link to replace Direct Commerce, Inc. (DCI). Walmart is rolling out APDP to suppliers in waves. As suppliers transition to the portal, they will no longer have the ability to submit disputes in DCI and must use the new app to dispute deductions.
There are two types of disputes suppliers can create in the new APDP app:
-
Disputes based on a claim number
-
Disputes based on an invoice number
The differences between disputing by claim and invoice
The vast majority of AP deductions (especially short-shipping deductions) are disputable as claims. Claim disputes involve creating a dispute in the portal and attaching descriptions and proof like normal.
Claims that appear in APIS and are disputable by claim line
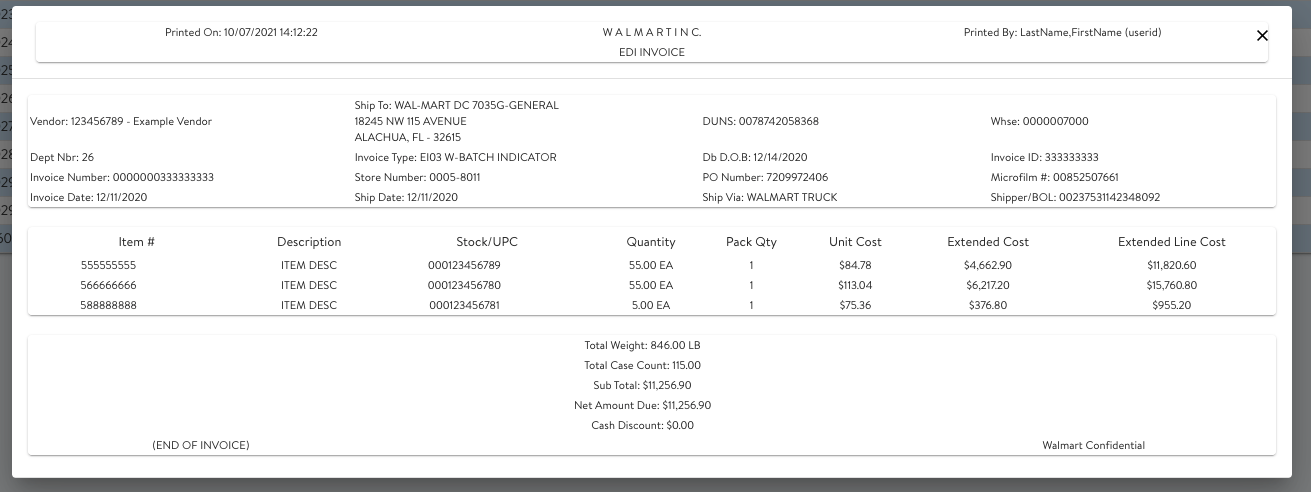
Some deductions are not visible as claims but are disputable as invoices. These deductions only appear on the supplier's check but do not have a claim number in APIS. These deductions will appear with a microfilm number. Users may search for these in APDP by the invoice number.
The main difference between claims disputes and invoice disputes is how Walmart took the deduction.
Deductions that are disputable as an Invoice
AR deductions are not disputable in the portal. Some will still have to go through the usual route of using the High Radius portal or showing proof documentation to buyers and merchants.
For a complete list of the deductions codes that are disputable in the APDP, go to our article on Walmart's Accounts Payable Disputes Portal (APDP).
Related Reading: Navigating the Accounts Payable Disputes Portal (APDP)
Creating a dispute based on a claim number
To create a dispute based on a claim number, follow these steps:
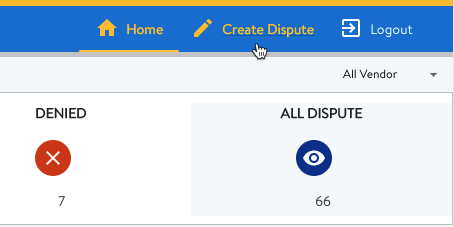
- At the top of the app, click the "Create Dispute" button.

*APDP Dashboard – Create Dispute button*
2. Select the 6-digit vendor number from the dropdown.
- Select "Claim" next to "Create dispute based on?"

*APDP Create Dispute – Selecting Claim*
4. Enter the claim number, or enter a date range within which the supplier received the deduction. This latter option allows the user to select dates on a calendar.
*APDP Create Dispute – Entering Claim #*

*APDP Create Dispute – Select Calendar Dates*

 **Note**: Users may only select a date range of 10 days or fewer.
5. Click the "Search" button.
-
Next, the user will receive a list titled "Claims List," showing the supplier's claims that match the criteria entered in the previous step. The following information will be on this list:
-
Claim/invoice number
-
Claim ID
-
Claim date
-
Claim amount
-
Invoice details
-
*APDP Create Dispute – Claims List*
7. Choose a claim to dispute by clicking the "Create Dispute" blue link.
- To view the invoice, click the "Invoice Details" number (represented as a blue link).
*APDP Create Dispute – Invoice Details*
8. Clicking the Create Dispute link leads to the "Create/Update Disputes" screen in the system. From here, users can select individual lines to dispute or update dispute lines.

*APDP Create/Update Disputes – Available Claim Lines to Dispute*
9. The following columns will be on the "Available Claim Lines to Dispute:"
-   Status

-   Claim Line Number (the remittance line number that had a deduction) with a checkbox next to it

-   Dispute Case number (appears when the user creates a dispute)

-   Dispute Number (appears when the user creates a dispute)

-   Item Number/UPC Number (the Walmart item number and the UPC if applicable)

-   Claim Amount (the amount of the deduction)

-   The deduction code and description

-   Item Quantity

-   Freight (the carrier for the order)

-   Shipping Method (Prepaid, Collect, or Parcel)

-   Load Number (the unique shipment number)

-   Dispute Amount (appears when the user creates a dispute)

-   Total Approved Dispute Amount (appears after the Dispute Analyst has reviewed the claim)

-   Attach Proof (file uploads for documentation to prove the dispute)
10. To dispute a claim line, check the box at the far left of the line.
-
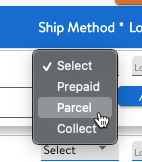
Update the following fields as needed:
- Freight value (FedEx, UPS, ATD, Others – specify in the field below)


- Shipping method (Prepaid, Parcel, or Collect)\
APDP Create Dispute – Select Ship Method
-   Dispute amount

-   Load number
12. The description field is mandatory in order to create a dispute. Here, the user can describe the reasoning behind the dispute and provide some context to help speed along the process. Keep it brief and make sure to use clear, descriptive language.

_APDP Create Dispute – Dispute Description_
13. Click the “Add” button to the right of the description to add the information to the new dispute. The system will display a message stating, “Successfully added.”
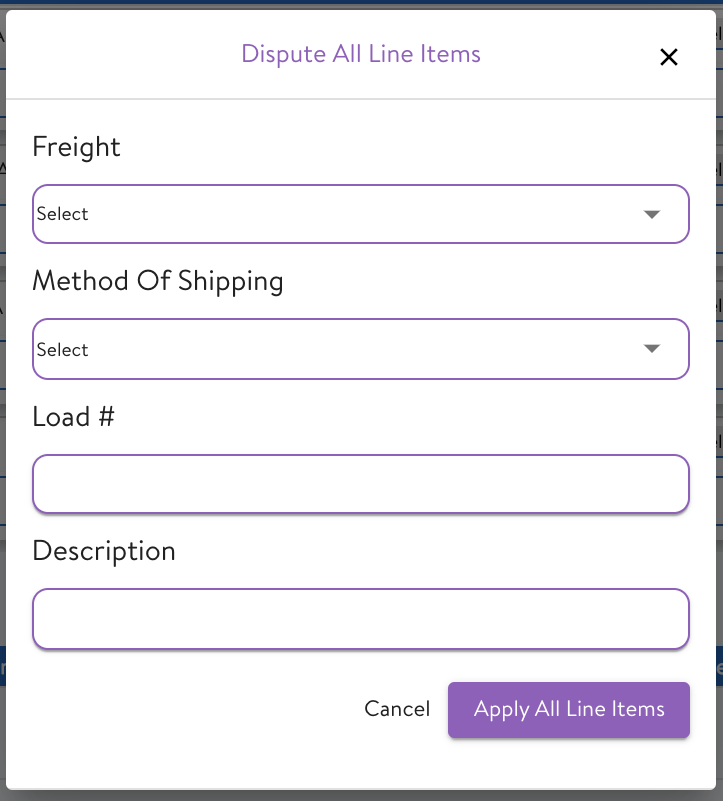
- **Note**: Users may add all of the lines to a dispute by clicking the “Dispute All” button at the top.
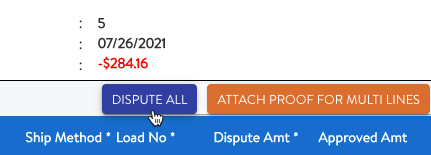
_APDP Create Dispute – Dispute All Line Items_
_APDP Create Dispute – Bulk Enter Dispute Information_
14. Users must attach supporting documentation, such as PODs or freight bills, using the "Attach Proof" link. Users may attach up to 30 files per dispute. Each attachment must be less than 25 MB in size.
- Note: Users may bulk-add documents to some or all of the claim lines in the claim lines list by clicking on the "Attach Proof for Multi Lines" button.
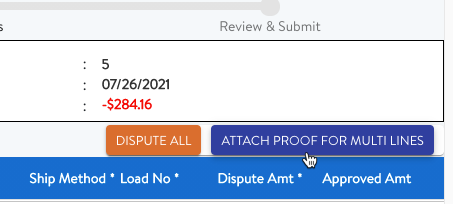
*APDP Create Dispute – Attach Proof for Multi Lines button*
- The following file formats are acceptable:
- Adobe PDF
- JPG or JPEG image
- Tag Image File Format (TIF or TIFF)
- Notepad WORD files
- EML (saved emails)
- Microsoft Outlook MSG files
- Microsoft Excel (XLSX or XLS)
![APDP Create Dispute -- Add Attachments]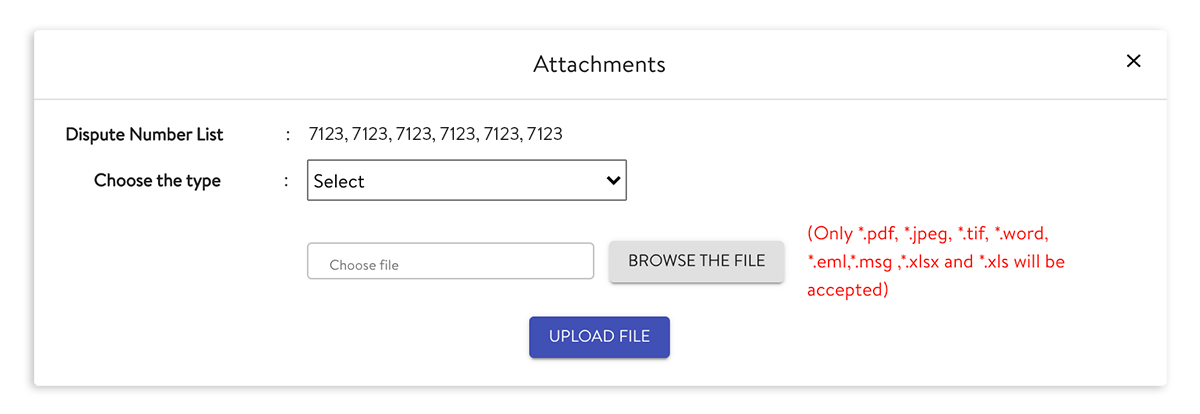
*APDP Create Dispute – Add Attachments*
15. Once the user has added all of the dispute information and documentation, it is time to click the "Next" button at the bottom of the page, under the "Submitted Disputes for Claim Lines" section.
![]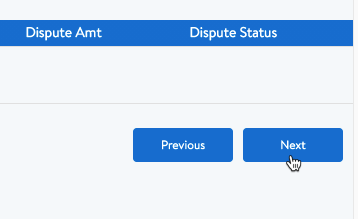
*APDP Create Dispute – Next button*
- After clicking the "Next" button, the user may still go back and edit the claim by clicking the "Previous" button.
- The user may click the "Save" button to create a draft of the dispute and return to it at a later time. Note: Users only have **14 days** during which to file a drafted dispute. After that time, the system will cancel the dispute.
16. Finally, click the "Submit" button to submit the dispute for review. A pop-up window will appear showing the dispute case number(s) and the dispute number(s).
![APDP Create Dispute -- Successfully submitted message]
*APDP Create Dispute – Successfully submitted message*
After submitting the dispute, the user will see the "Disputes List," with details of each dispute. Information about disputes will include:
-
Dispute number
-
Dispute case number (only displayed when the dispute is not in Draft status)
-
Claim line number
-
Deduction Code and description
-
Item Quantity
-
Freight selected
-
Ship method selected
-
Load number
-
Claim amount
-
Dispute amount
-
Proofs Attached (file names of attached proof documentation)
![APDP Disputes List]
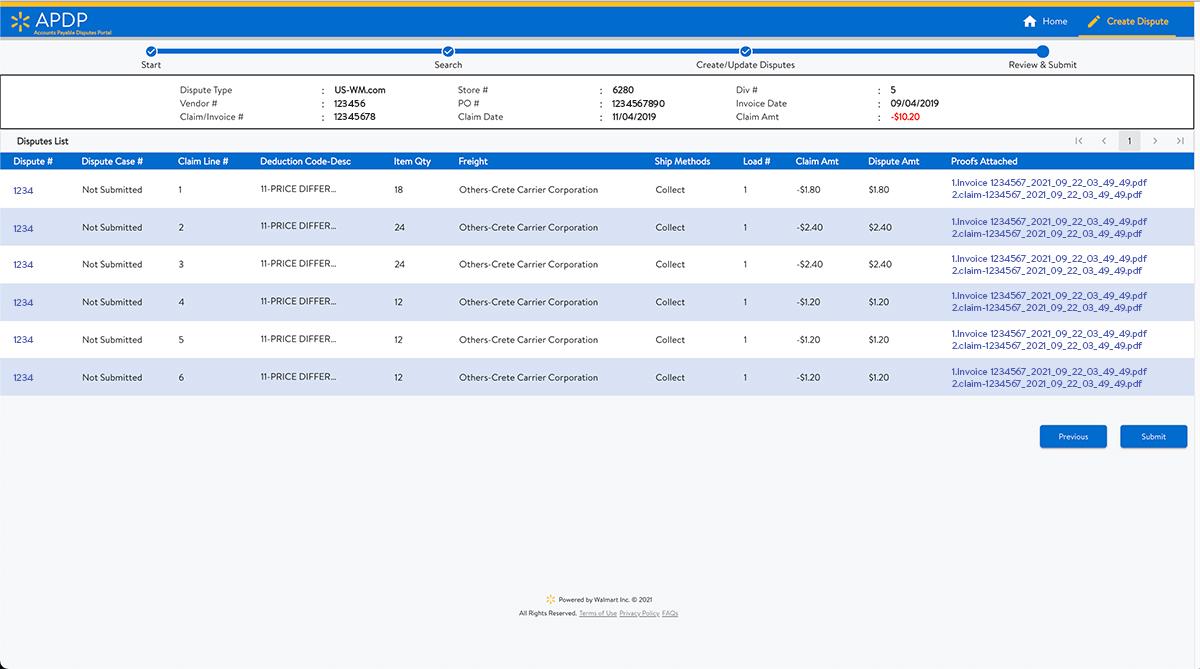
APDP Disputes List
Submitted Disputes for Claim Lines section
Under the "Available Claim Lines to Dispute" section is another section titled "Submitted Disputes for Claim Lines." This list shows disputes that the user has already submitted for the selected claim.
![APDP Submitted Disputes for Claim Lines]

APDP Submitted Disputes for Claim Lines
In this section, users may update their dispute information for disputes. The following columns are available:
-
Claim Line Number (the line number on the remittance showing the deduction)
-
Dispute Case Number (generated by the system when the user submitted the dispute)
-
Dispute Number (generated by the system when the user submitted the dispute)
-
Item Number/UPC Number (Walmart item number and UPC if applicable)
-
Claim Amount (the amount deducted from the remittance)
-
Deduction Code and description
-
Dispute Amount
-
Dispute Status
The list only displays 10 disputes at a time. Users may navigate more pages by clicking on the arrows and page numbers at the top right of the list.
Creating a dispute based on an invoice number
To create a dispute based on an invoice number, follow these steps:
-
At the top of the app, click the "Create Dispute" button.
![APDP Dashboard -- Create Dispute button]
APDP Dashboard – Create Dispute button
-
Select the 6-digit vendor number from the dropdown.
-
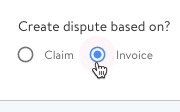
Select "Invoice" next to "Create dispute based on?"
![APDP Create Dispute -- Select Invoice]
APDP Create Dispute – Select Invoice
-
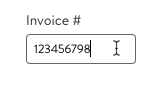
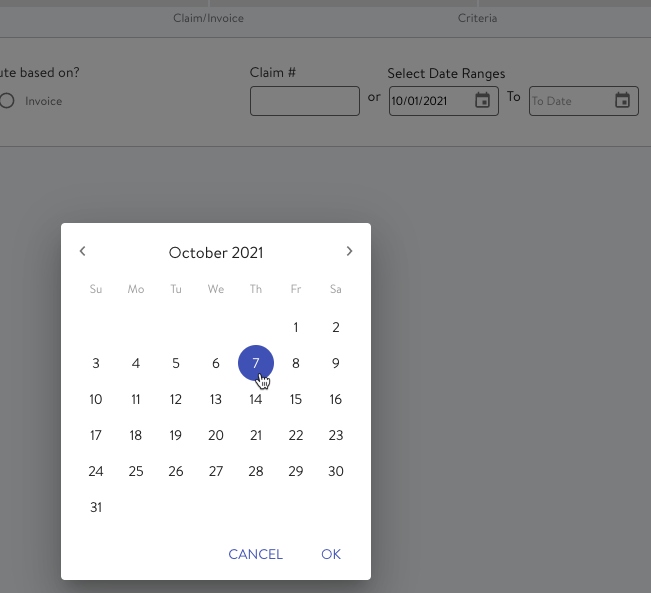
Enter the invoice number, or enter a date range within which the supplier received the deduction. This latter option allows the user to select dates on a calendar.
![APDP Create Dispute -- Invoice Number]
APDP Create Dispute – Invoice Number
![APDP Create Dispute -- Select Calendar Dates]
APDP Create Dispute – Select Calendar Dates
Note: Users may only select a date range of 10 days or fewer.
-
Click the "Search" button.
-
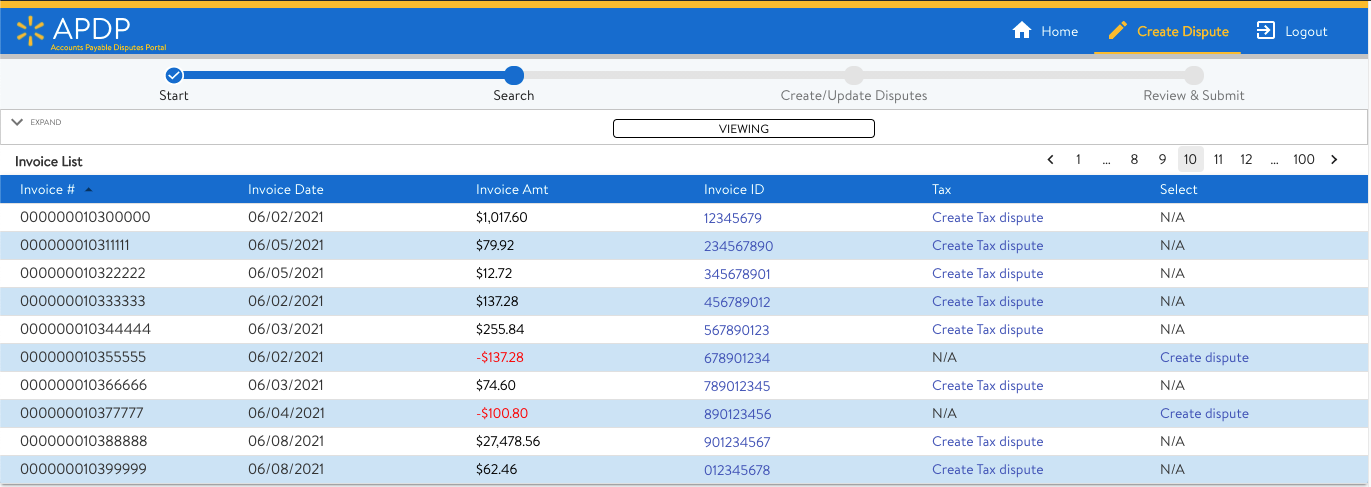
Next, the user will receive a list of the supplier's invoices that match the criteria entered in the previous step. The following information will be on this list:
-
Invoice Number
-
Invoice Date
-
Invoice Amount
-
Invoice ID
-
An option to create a tax dispute (for tax correction deductions)
-
An option to create an invoice dispute
![APDP Create Dispute -- Invoice List]
APDP Create Dispute – Invoice List
-
-
To create a dispute, click on "Create dispute" (represented as a blue link).
-
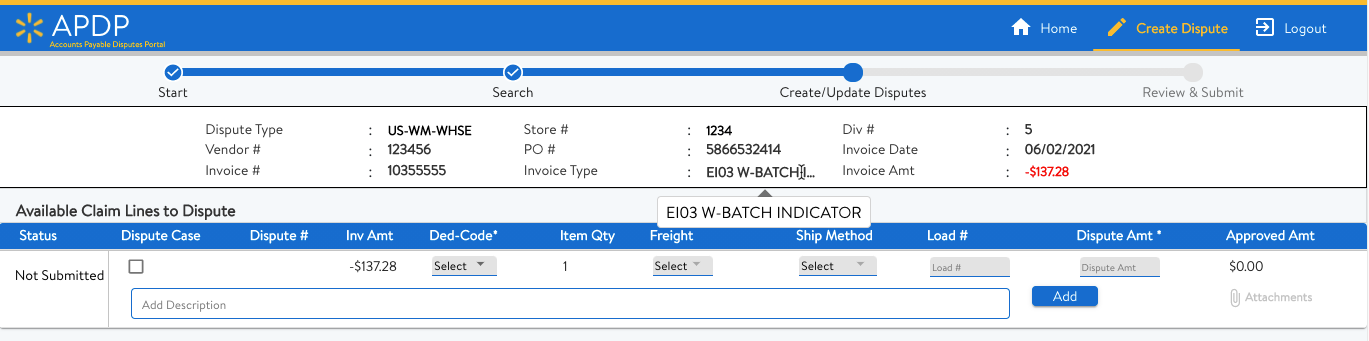
Clicking Create dispute leads to the "Create/Update Disputes" screen in the system. From here, users can select individual invoice lines to dispute or update dispute lines.
-
The following columns will be on the available lines to dispute page:
-
Dispute status
-
Checkbox (selects the line to dispute)
-
Dispute Case Number (appears when the user creates a dispute)
-
Dispute Number (appears when the user creates a dispute)
-
Invoice Amount
-
Deduction code
-
Item Quantity
-
Freight (the carrier for the order)
-
Shipping Method (Prepaid, Parcel, Collect)
-
Dispute Amount
-
Approved Amount (appears after the Dispute Analyst has reviewed the claim)
-
Attachments (file uploads for documentation to prove the dispute)
![APDP Create Dispute -- Invoice Summary]
APDP Create Dispute – Invoice Summary
-
-
To dispute an invoice line, check the box at the far left of the line.
-
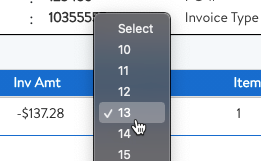
Select the Deduction code listed on the invoice. Here is a full list of the Walmart deduction codes.
![APDP Create Dispute -- Select the Deduction Code]
APDP Create Dispute – Select the Deduction Code
-
Add the dispute amount.
-
Users must attach supporting documentation, such as PODs or freight bills under the "Attachments" column. Users may attach up to 30 files per dispute. Each attachment must be less than 25 MB in size. The following file formats are acceptable:
-
Adobe PDF
-
JPG or JPEG image
-
Tag Image File Format (TIF or TIFF)
-
Notepad WORD files
-
EML (saved emails)
-
Microsoft Outlook MSG files
-
Microsoft Excel (XLSX or XLS)
-
-
The description field is mandatory in order to create a dispute. Here is where the user can describe the reasoning behind the dispute and provide some context to help speed along the process. Keep it brief and make sure to use clear, descriptive language.
![APDP Create Dispute -- Dispute Description]
APDP Create Dispute – Dispute Description
-
Click the "Add" button under the selected line item to add the changes and updates to a new dispute. The system will display a message stating, "Successfully added."
-
Once the user has added all of the dispute information and documentation, it is time to click the "Next" button at the bottom of the page, under the submitted disputes section.
-
After clicking the "Next" button, the user may still go back and edit the dispute by clicking the "Previous" button.
-
The user may click the "Save" button to create a draft of the dispute and return to it at a later time.
-
-
Finally, click the "Submit" button to submit the dispute for review. A pop-up window will appear showing the dispute case number and the dispute number.
![APDP Create Dispute -- Successfully submitted message]
APDP Create Dispute – Successfully submitted message


Invoice Lines Adjustments section
Under the "Invoice Summary Adjustments" section is another section titled, "Invoice Lines Adjustments." This list shows disputes that the user has submitted for the selected invoice or invoice date range.
In this section, users may update their dispute information for disputes. The following columns are available:
-
Dispute Case Number (generated by the system when the user submitted the dispute)
-
Dispute Number (generated by the system when the user submitted the dispute)
-
Claim Amount
-
Deduction Code
-
Dispute Amount
-
Dispute Status
![APDP Submitted Invoice Lines]

APDP Submitted Invoice Lines
The list only displays 10 disputes at a time. Users may navigate more pages by clicking on the arrows and page numbers at the top right of the list.
How to dispute a deduction in Deductions Navigator
SupplyPike has updated the Deductions Navigator app to accommodate the changes in Walmart's deductions dispute process.
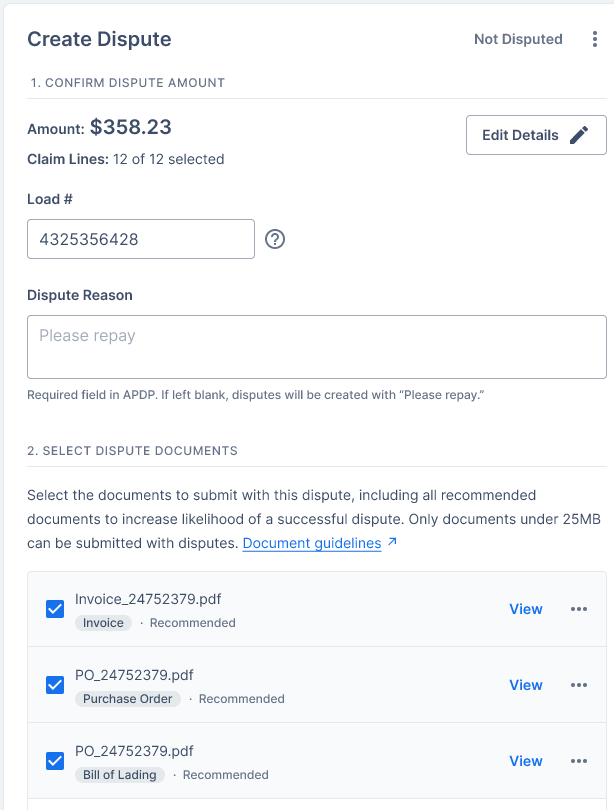
Deductions Navigator allows users to choose a subset of a deduction's claim lines to dispute if they wish, but the default, recommended behavior is to submit all claim lines under a deduction together.
![Deductions Navigator -- Disputing Multiple Claim Lines]
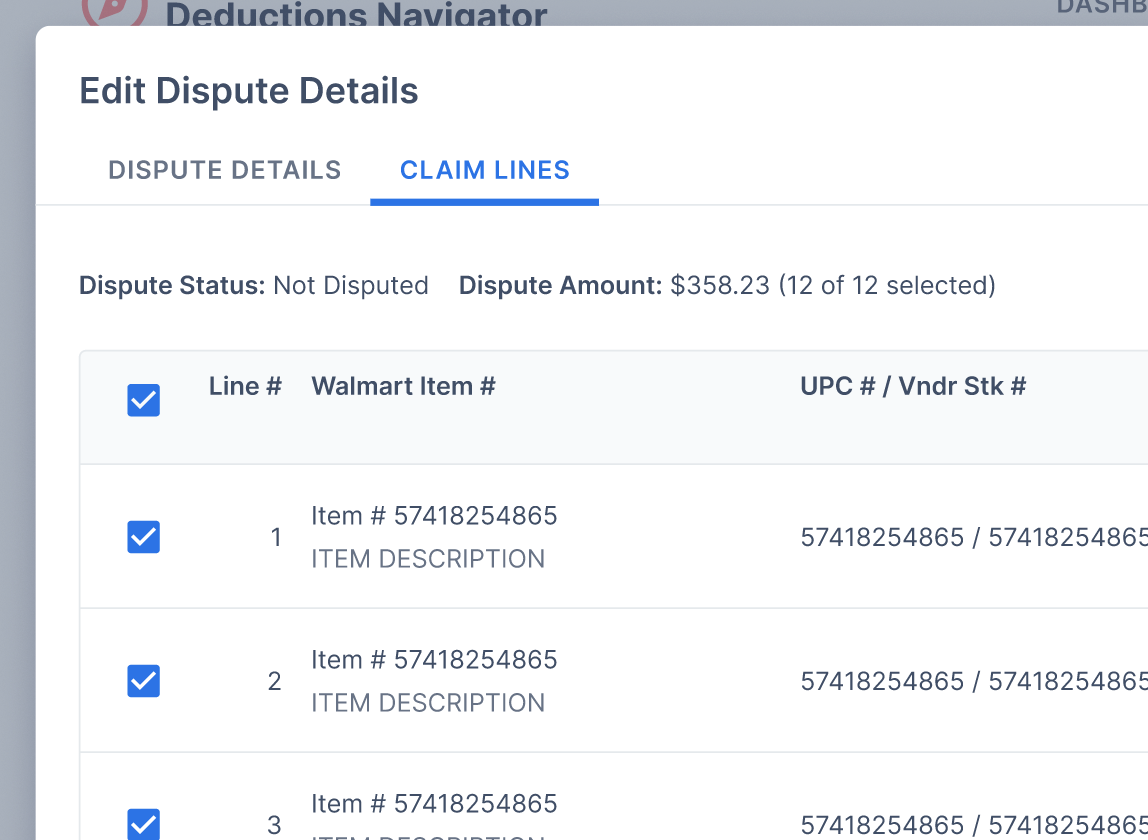
Deductions Navigator – Disputing Multiple Claim Lines
Enter your deduction disputes details quickly and easily:
![Deductions Navigator -- Edit Dispute Details]

Deductions Navigator – Edit Dispute Details
One-click disputes are still here! We add the data, and you just click the dispute button. Easy peasy!
![Deductions Navigator -- Create Dispute]
Deductions Navigator – Create Dispute
Getting started with Deductions Navigator is easy! Sign up for your tour today!
[![We still have 1-click disputes. Easy as pie. Get Started.]

Related Resources
Written by The SupplyPike Team
About The SupplyPike Team
SupplyPike builds software to help retail suppliers fight deductions, meet compliance standards, and dig down to root cause issues in their supply chain.
Read More
About

SupplyPike helps you fight deductions, increase in-stocks, and meet OTIF goals in the built-for-you platform, powered by machine learning.
View SupplyPike's Website